It was amazing to involve the girls in this process, now 5 and 3. They really got a kick out of helping create things versus helping pick things to buy. That being said, there was a lot of homework on my part to help them choose projects that were doable, and thoughtful for their gift recipients.
I would totally do this again. It was labourious but well worth the feeling that we weren't generating as much waste, and had put so much thought into the gift-giving process.
Here is the line-up of gifts that we tried this year, how well they worked, and some that we'd like to try in the future.
Kid-Friendly Projects...
Homemade Oatmeal Lavender Bath Soak
This was a hit! It was super-easy for the girls to measure and mix, and very little mess. They had a blast decorating labels for jars. This was relatively inexpensive, using oatmeal and epsom salts we already had, dried lavender we had collected from the garden, and lavender essential oil (which I've fallen in love with, so it was a very multi-purpose purchase).

We got the recipe from this site, Homemade Gifts Made Easy. They even have a printable label you can download!
Chamomile Lavender Bath Melts
A simple recipe using shea butter, dried lavender, chamomile tea and lavender essential oil. The recipe called for cocoa butter, which we didn't have, and it still worked without it. The girls helped with measuring, and I did the heating. We used silicone mini-muffin trays and they set easily in the fridge. I tried one last night and it was divine! A bit of a pain to clean off the tub, as it sticks to the tub, but it leaves your skin feeling so smooth and moisturized.

We used the recipe from Be Beautiful, but omitted the cocoa butter.
Rosemary 'Bubble' Bath
The girls had a blast measuring and mixing this bubble bath. We used dried rosemary from our pantry, and they helped mix all the ingredients and make fun labels for the bottles. Initially we omitted the glycerin in the recipe from Ann Randolf's page, but luckily tested it on a bath with the girls, and there were no bubbles! Her recipe said that you could use coconut oil and/or glycerin, but without glycerin our bubbles didn't hold. It was a neat experiment for the girls though, since they got to test it with glycerin the next time and it was much more bubbly!

We found out why Ann didn't posted a picture of the finished product; it comes out cloudy brown mixture! It smells awesome though, and the coconut oil makes it a nice moisturizing bath. It was relatively inexpensive to make, as castile soap and glycerin are not expensive, and we already had coconut oil.
Simple Bird Houses
This was the girls' idea, and we helped them find a template that would be simple enough for them to assemble with help. We found the template online,and Andrew scavenged our wood pile to find a nice piece of cedar left from my grandparents deck we had just torn down (we bought the house from my family). That made the present a bit more meaningful for them, and it was great that we were able to use reuse wood. The rest of that deck will find a home in new arbours and trellises for our garden next summer hopefully. Andrew cut the pieces from the template for them, and they drilled holes, screwed in the front and tapped in the nails with his assistance. One of the girls tried to steel some wood after the project to take to bed because she said she LOVED building things now.
We chose this pattern from Birds and Blooms. This site was amazing because it described how hole size, choice of materials and placement will affect what type and whether a bird nests in your box. This was invaluable advice, because our initial plan was to have the girls paint them, but we learned that bright colours or smelly paint may turn birds off.
.jpg)
Home Science Kits for Kids
This was amazing on so many levels. As a science teacher on a semester leave, it was so nice to get my hands into some science again. Even though many of the activities we included were familiar to me, I found this AH-MAZING printable science e-book from I Can Teach My Child (which has become a new favourite kid activity resource). The girls helped shop for the kit materials, and assemble the kits. we painted each scientist an apron personalized with their name, and podged them a personal science notebook.

In addition to the materials listed on this page, we added a "water beads" activity using those floral water beads (from the dollar store), and a bright coloured 'test tube' from the dollar store (aka coloured shot glass). We gave them a microscope, and used swim goggles for goggles, since the safety goggles were so overpriced, none of the activities really need eye protection, and they could serve double-duty.
My addition to the e-book, was to flag each activity with tips on how messy, time-consuming or dangerous it would be. We received good feedback so far from the gift recipients!

Adult Projects (not the x-rated kind, just not kid friendly!)
Jewellery Organizer
I picked up a frame at the local reuse store, some galvanized pest fencing and small cup hooks from the hardware store and did some rearranging to create a jewellery organizer like this one from Be Inspired Teens

Felt Flowers
These were so fun to make. They were tedious to cut out, but the sewing was simple, and I could cart them around with me to fill the time if I was waiting for a meeting to start or a bus to come (knitting would do that too, but I'm not a knitter). I also found this to be a great occupier during those tempting pre-holiday season evenings when there were many batch-cooked cookies waiting in the freezer. Keeping my hands busy while watching tv saved me a few thousand calories for sure!
There were many great tutorials out there (All Crafts catalogued a ton of them), but my favourites were these:
Felt Camelia from How Joyful. I made these using buttons or felt-covered balls in the centre. I attached both a hair clip, and a pin to the back to make them more versatile to wear as a hair clip, clip to a headband, attach to a purse strap, or use as a broach on a wrap or shirt.

Felt Rose from How Joyful.

Felt Flowers from Mrs. Priss.These were super-cute done in small sizes, with fun buttons in the middle, and a couple little green leaves out the side for girls' barrettes.

Mens' Tie Belt and Bangle
This was so fun. I took one of the girls with me to Goodwill "By the Pound" near us, which we hadn't explored yet. We picked up 10 ties for under $2. I did a bit of research to find a good way to clean ties (which can be fussy since they're usually made of silk), and found it on E-how here (its kind of shocking how many how-tos there are now).
Obi-Style Tie Belt
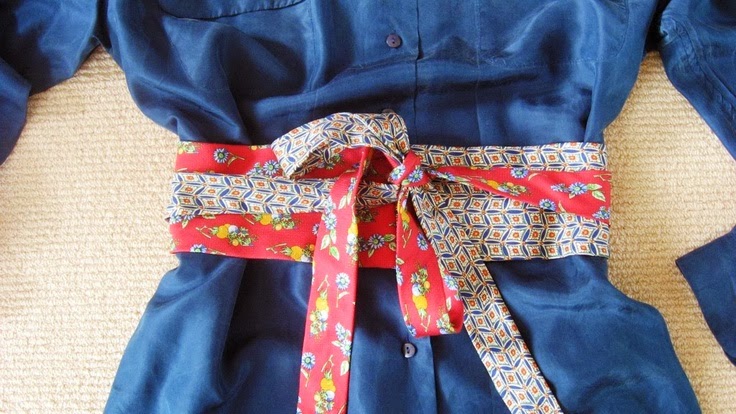
Mark Montano's video tutorial for an Obi-style belt overlapping the ties diagonally, and from the Crafty Minx, an obi-style belt overlapping the ties horizontally.
Faux Buckle Style Belt
I used a couple tutorials, but mainly this one from A Red Ribbon, to turn a men's tie into a a headband, to make this belt. I figured it could be a belt, but could be cinched tighter to wear as a headband. I sewed in the buckle, but waited until the recipients tried them on to sew in snaps at 2 spots: for a dress belt, and for a hip belt.


Reading Tent
This was my favourite by far. I think it was more a present for me than the girls. I found duvet fabric that was super-wide and I got the length of the tent from the width of the fabric. It could easily be made using a duvet cover or queen-sized sheet to be simple, and the sewing is super easy, with 4 straight stitches across to create pockets for the ribbon and hoola hoop.

I'll update later with a photo of our finished product. I hung a low-watt light inside, and recovered floor and back cushions. For each girls I made a little personalized heart pillow with their name sewn on in felt.

Block Puzzle
Andrew cut cubes from new pine to make these adorable photo puzzles. We were hoping to salvage wood we already had, but most of it was painted with exterior paint, which would not be suitable for the 2-year olds these gifts were intended for. The puzzle is definitely too tricky to solve for a 2-yr old, but its a keepsake for sure.

Phew! The gift preparation this year was a lot of hard work, and I couldn't have tried all of these ideas if I weren't on a leave from work this semester, but I think some of them would be doable if I was working. For next Christmas, or upcoming birthdays, when I'm back at work, I would definitely need to think about these things MUCH more in advance.